Overview
| Item | Description |
|---|---|
| Purpose | Integration for assessment scoring |
| Communicates With | ART Student Equation Scoring Service THSS |
| Repository Location | https://github.com/SmarterApp/TDS_TestIntegrationSystem |
| Additional Documentation | TIS REST API README |
Instructions
Create MSSQL RDS Instance
- Create a MSSQL RDS Instance using a MSSQL Server Edition that suits the environment’s needs
- Choose at least a SQL Server Web instance
- Configure the MSSQL RDS Instance based on the environment’s needs:
Create TIS Databases
- Create the following databases on the MSSQL Server:
OSS_TISOSS_ItembankOSS_ConfigsOSS_TestScoringConfigs
Create TIS Databse User Account(s)
- Create a user account (i.e. an MSSQL login or an Active Directory user) that has access to read/write (
db_readeranddb_writerroles) for the databases cited above.
Create the OSS_TIS Database Schema
- Run the following scripts in order against the
OSS_TISdatabase:- [\Path\to\TIS Repository]
\TDSQAService\OSS.TIS\SQL\TISDB\1_Create_Objects.sql - [\Path\to\TIS Repository]
\TDSQAService\OSS.TIS\SQL\TISDB\2_Configuration_IAB Tests.sql - [\Path\to\TIS Repository]
\TDSQAService\OSS.TIS\SQL\TISDB\2_Configuration_ICA_OP Tests.sql - [\Path\to\TIS Repository]
\TDSQAService\OSS.TIS\SQL\TISDB\3_ScoringDaemonConfiguration.sql -
[\Path\to\TIS Repository]
TDSQAService\OSS.TIS\SQL\TISDB\4_IRP_DataLoad.sqlIMPORTANT: The
3_ScoringDaemonConfiguration.sqlscript will require configuration prior to execution. Before executing the script, open it in an editor and configure the following:
- [\Path\to\TIS Repository]
-- these can be IP or server name
set @IP = '[FQDN or IP address of the database server]'
set @privateIP = '[Private IP address of the database server]' -- can be different if you want to use a private IP
set @dbname = '[Name of the TIS database; use OSS_TIS if following this guide]'
set @scoringDaemonName = '[Name of the TIS Scoring Daemon.  Should match the value in settings.config for ScoringDaemon.MachineName]'
set @itemScoringHost = '[FQDN or IP address of the Item Scoring Server]/itemscoring/Scoring'
set @rubricCallbackHost = 'https://[FQDN or IP address of the Rubric Server]/student/'
- Example configuration:
-- these can be IP or server name
set @IP = 'tis-deployment2.cugsexobhx8t.us-west-2.rds.amazonaws.com'
set @privateIP = 'tis-deployment2.cugsexobhx8t.us-west-2.rds.amazonaws.com' -- can be different if you want to use a private IP
set @dbname = 'OSS_TIS'
set @scoringDaemonName = 'MyTISScoringDaemon'
set @itemScoringHost = '54.200.55.254:8080/itemscoring/Scoring'
set @rubricCallbackHost = 'https://54.200.55.254/student/'
Create the OSS_TestScoringConfigs Database Schema
- Run the following scripts in order against the
OSS_TestScoringConfigsdatabase:- [\Path\to\TIS Repository]
\TDSQAService\OSS.TIS\SQL\TestScoringConfigs\1_Tables.sql - [\Path\to\TIS Repository]
\TDSQAService\OSS.TIS\SQL\TestScoringConfigs\2_Views.sql - [\Path\to\TIS Repository]
\TDSQAService\OSS.TIS\SQL\TestScoringConfigs\3_Configuration.sql
- [\Path\to\TIS Repository]
Create the OSS_Configs Database Schema
- Run the following scripts in order against the
OSS_Configsdatabase:-
[\Path\to\TIS Repository]
\TDSQAService\OSS.TIS\SQL\TDSConfigs\1_Create_Objects.sqlNOTE: Ignore the SQL warnings returned by this script
-
[\Path\to\TIS Repository]
\TDSQAService\OSS.TIS\SQL\TDSConfigs\2_Configuration.sql
-
Create the OSS_Itembank Database Schema
- Run the following scripts in order against the
OSS_Itembankdatabase:- [\Path\to\TIS Repository]
\TDSQAService\OSS.TIS\SQL\TDSItemBank\1_Create_Synonyms_Sproc.sql - [\Path\to\TIS Repository]
\TDSQAService\OSS.TIS\SQL\TDSItemBank\2_Create_Synonyms_Config.sql
IMPORTANT: The
2_Create_Synonyms_Config.sqlscript will require configuration prior to execution Before executing the script, open it in an editor and configure the following: - [\Path\to\TIS Repository]
-- TODO: set these to the database names you created
set @TDSConfigsDatabaseName = '[Name of the TIS Configuration database; use OSS_Configs if following this guide]'
set @TestScoringConfigsDatabaseName = '[Name of the Test Scoring Configuration database; use OSS_TestScoringConfigs if following this guide]'
- Example configuration:
-- TODO: set these to the database names you created
set @TDSConfigsDatabaseName = 'OSS_Configs'
set @TestScoringConfigsDatabaseName = 'OSS_TestScoringConfigs'
- [\Path\to\TIS Repository]
\TDSQAService\OSS.TIS\SQL\TDSItemBank\3_Create_Objects.sql - [\Path\to\TIS Repository]
\TDSQAService\OSS.TIS\SQL\TDSItemBank\4_Configuration.sql - [\Path\to\TIS Repository]
\TDSQAService\OSS.TIS\SQL\TDSItemBank\5_LoadPackages.sql -
[\Path\to\TIS Repository]
\TDSQAService\OSS.TIS\SQL\TDSItemBank\6_TestToolConfiguration.sqlNOTE: The “context” values may not be valuable; they should be treated as sample data (many test names do not match what is available from the SBAC FTP site)
Create AWS Instance
- Create server instance to host Test Itegration Services (TIS) components
- AWS instance must be at least a t2.small
- Select an image with the Windows Server 2012 R2 Base 64-bit operating system
- Create an AWS security group with the following ports for inbound TCP traffic (can be done during instance creation):
- 1433
- 80
- 3389
- 443
Configure Windows AWS Instance
Configure the Web Server Components
- Connect to the Windows server via Remote Desktop
- Click on Server Manager (in toolbar next to Start Button)
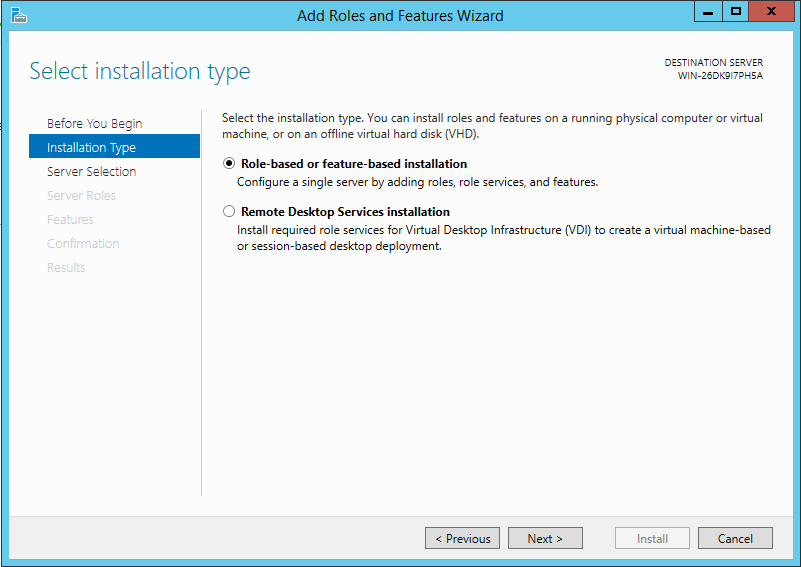
- Click on Add Roles and Features
- Follow the wizard prompts:
-
Choose Role-based:
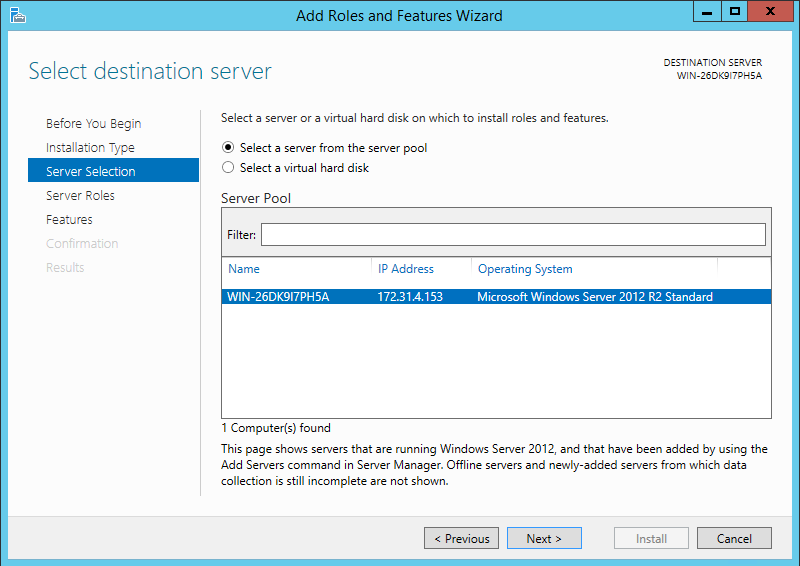
-
Leave select a server from the server pool selected (should show the name of the current server):
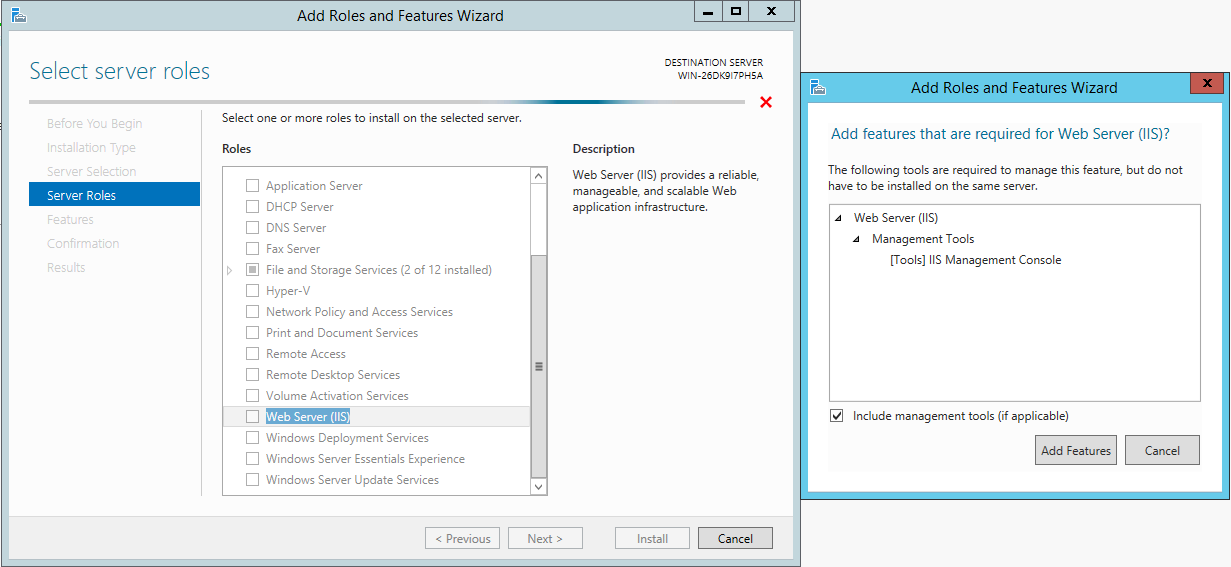
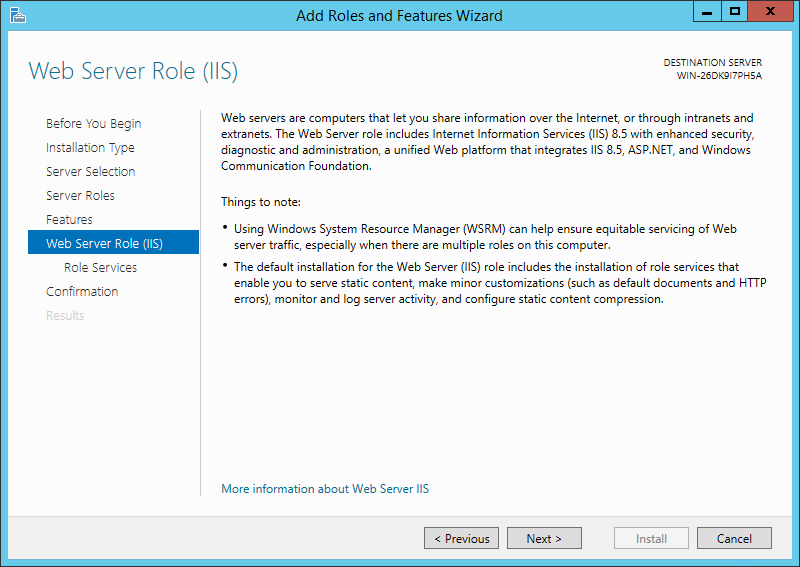
- Scroll down and check the Web Server (IIS) role:
- A dialog will appear (shown to the right in the screenshot) to confirm adding the feature. Click Add Features to confirm
- Check the Application Development checkbox beneath the Web Server (IIS) role
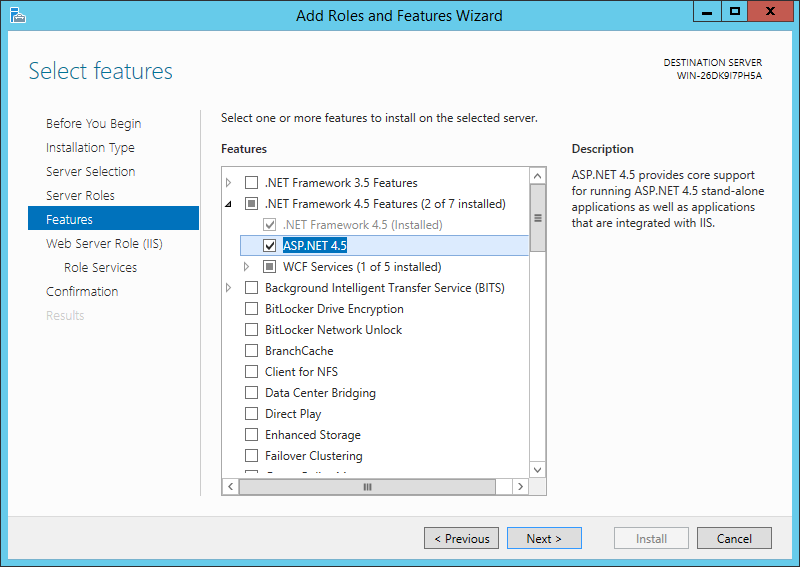
- Choose to install ASP.NET 4.5
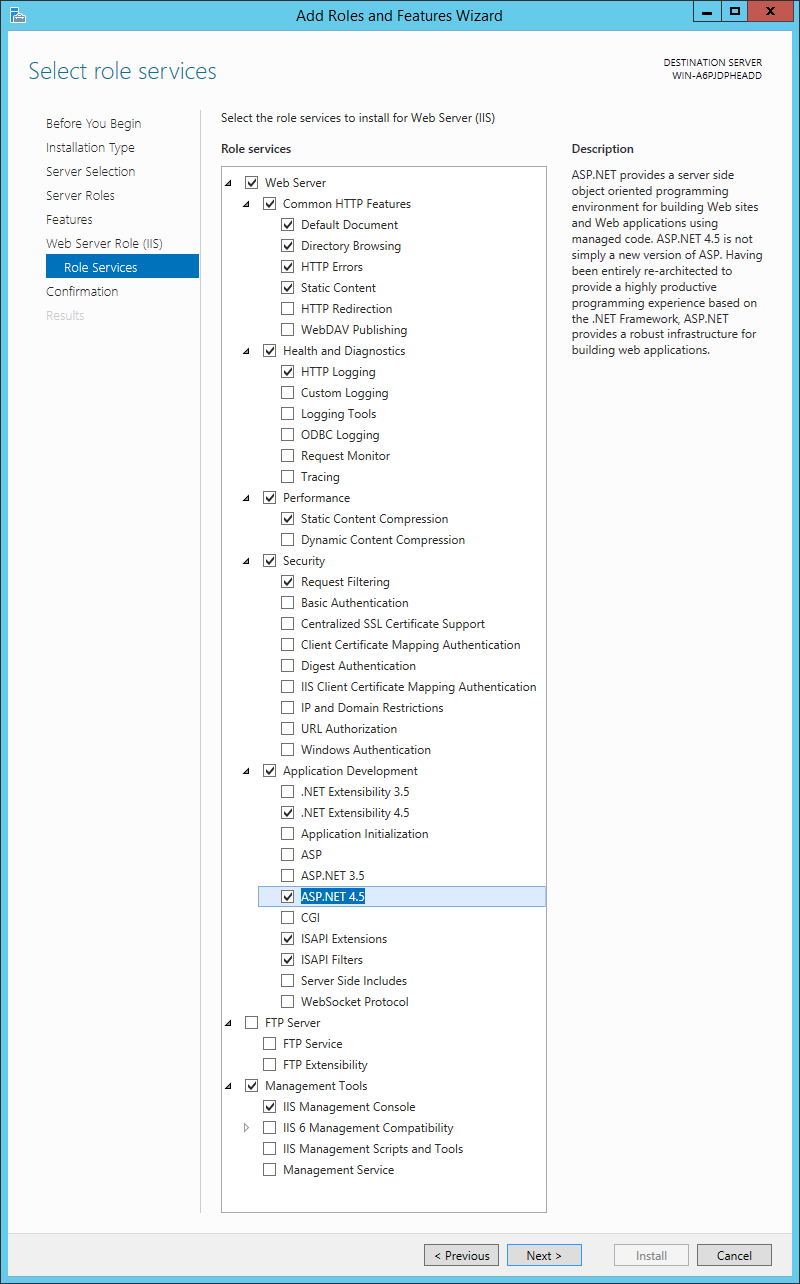
-
Expand the .NET Framework 4.5 Features and check the ASP.NET 4.5 checkbox:
-
Click Next on the information screen to continue with the server’s configuration:
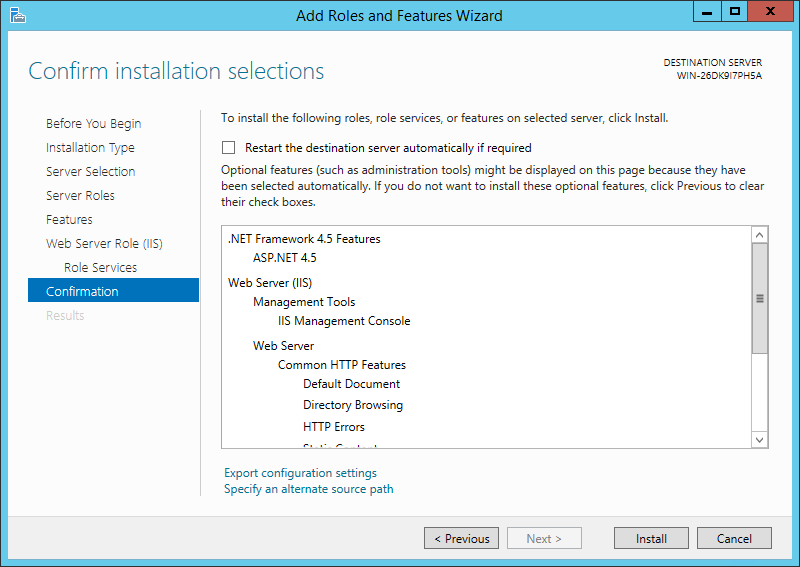
-
Review the selected features and click Next once satisfied:
-
Click Install to add the required features to this server:
- After the features have been installed, click Close to exit the wizard
Configure IIS Permissions for the Log Directory
IMPORTANT: Repeat the steps below for each log file directory. If you want applications to write to different log file directories, the IIS_IUSRS must be able to write to the desired directory/directories.
- Launch the File Explorer
- Navigate to the directory where the application(s) is/are configured to write log entires
- Refer to the
LogFilePath valuein theweb.config - Example: C:\inetpub\logs
- Refer to the
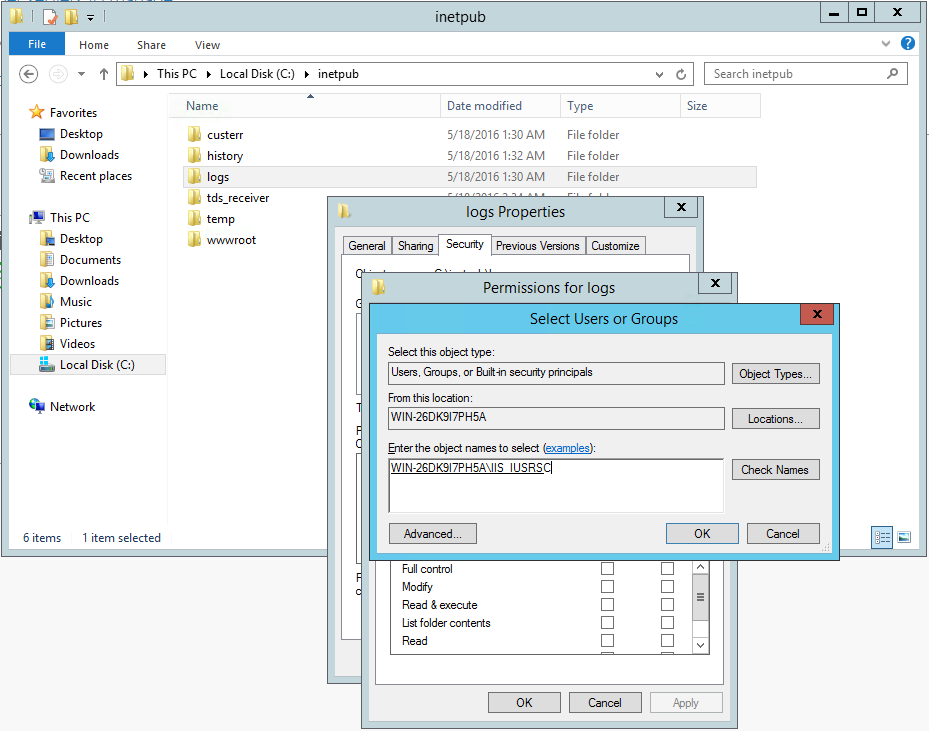
- Right-click on the directory and choose Properties
- Click on the Security tab
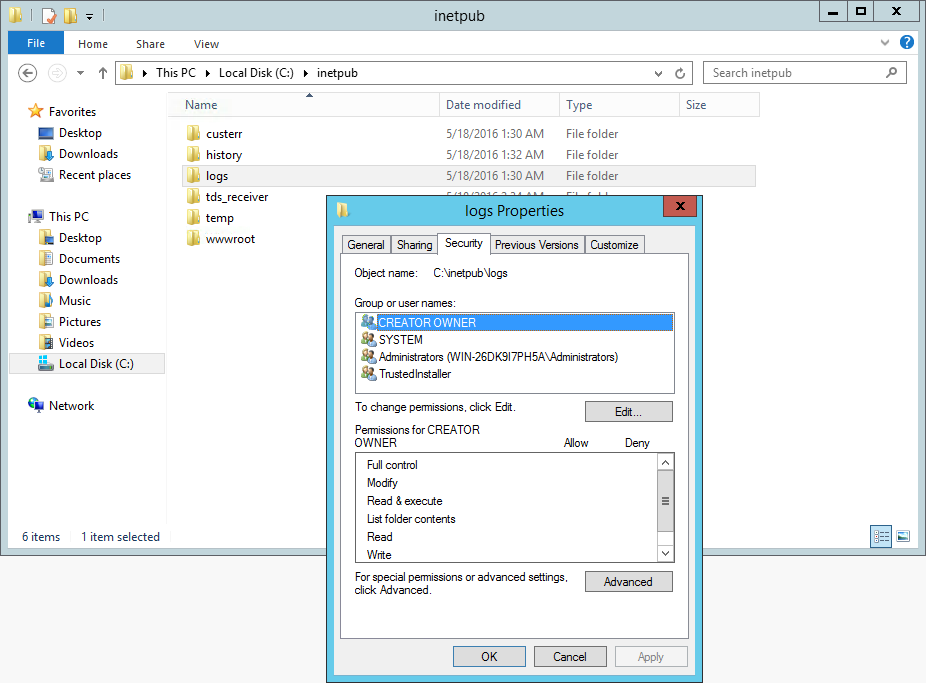
- Click the Edit button
- Click the Add… button
- Enter IIS_IUSRS in the Enter object names to select field and click Check Names
- The IIS_IUSRS should be updated to include the server name, indicating the user group was found.
- An example of the result after the Check Names button is clicked:
- Click OK
- Give the IIS_IUSRS Write permission to the log directory:
- Scroll down in the list of available permissions
- Check the box next to Write
- An example of granting Write permission to the IIS_IUSRS group:
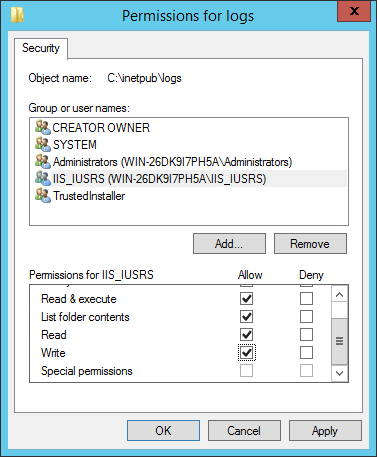
- Click OK
- Click OK
Add Inbound and Outbound Firewall Rules to Allow Communicating with SQL Server
- Launch the Windows Firewall with Advanced Security pane
- While viewing the Inbound Rules, click on New Rule…
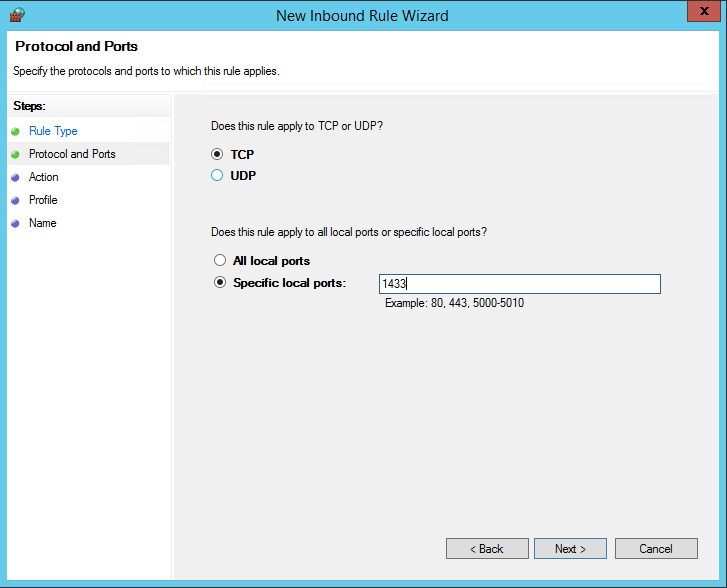
-
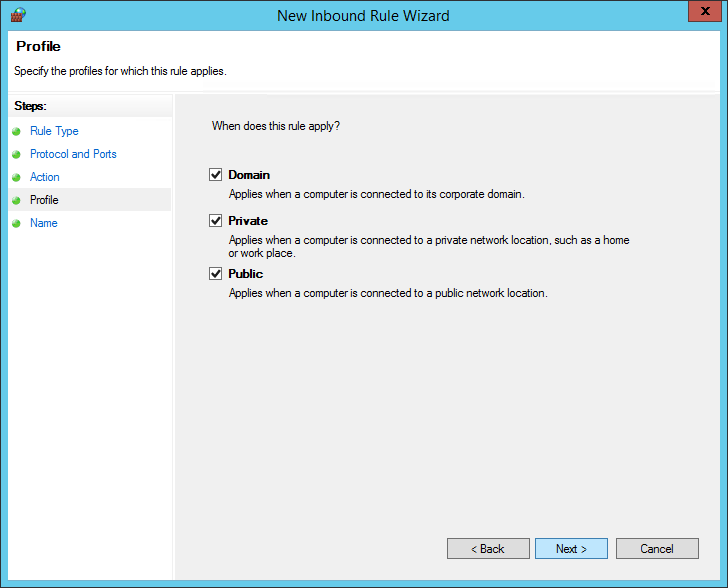
Set the Rule Type to Port:

-
Choose TCP and provide the port number (MSSQL Server default port is 1433)
-
Leave Allow the Connection selected:
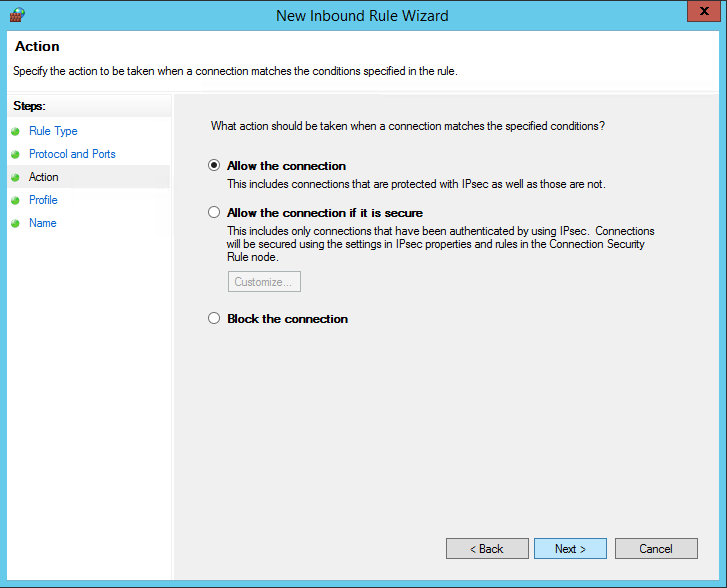
-
Leave all checkboxes checked on the Apply Rule screen:
-
Provide a name for the rule and click the Finish button:

- Repeat the steps above, creating an Outbound Rule for the same port.
Deploy the TDS Receiver
Build the TDS Receiver
- Clone the TDS_TestIntegrationSystem repository to a machine that can build .NET applications:
git clone https://github.com/SmarterApp/TDS_TestIntegrationSystem.git
- Launch Visual Studio
-
Open the
TISServices/TISServices/TISServices.sln - In Visual Studio, right-click on the Solution and choose Publish…
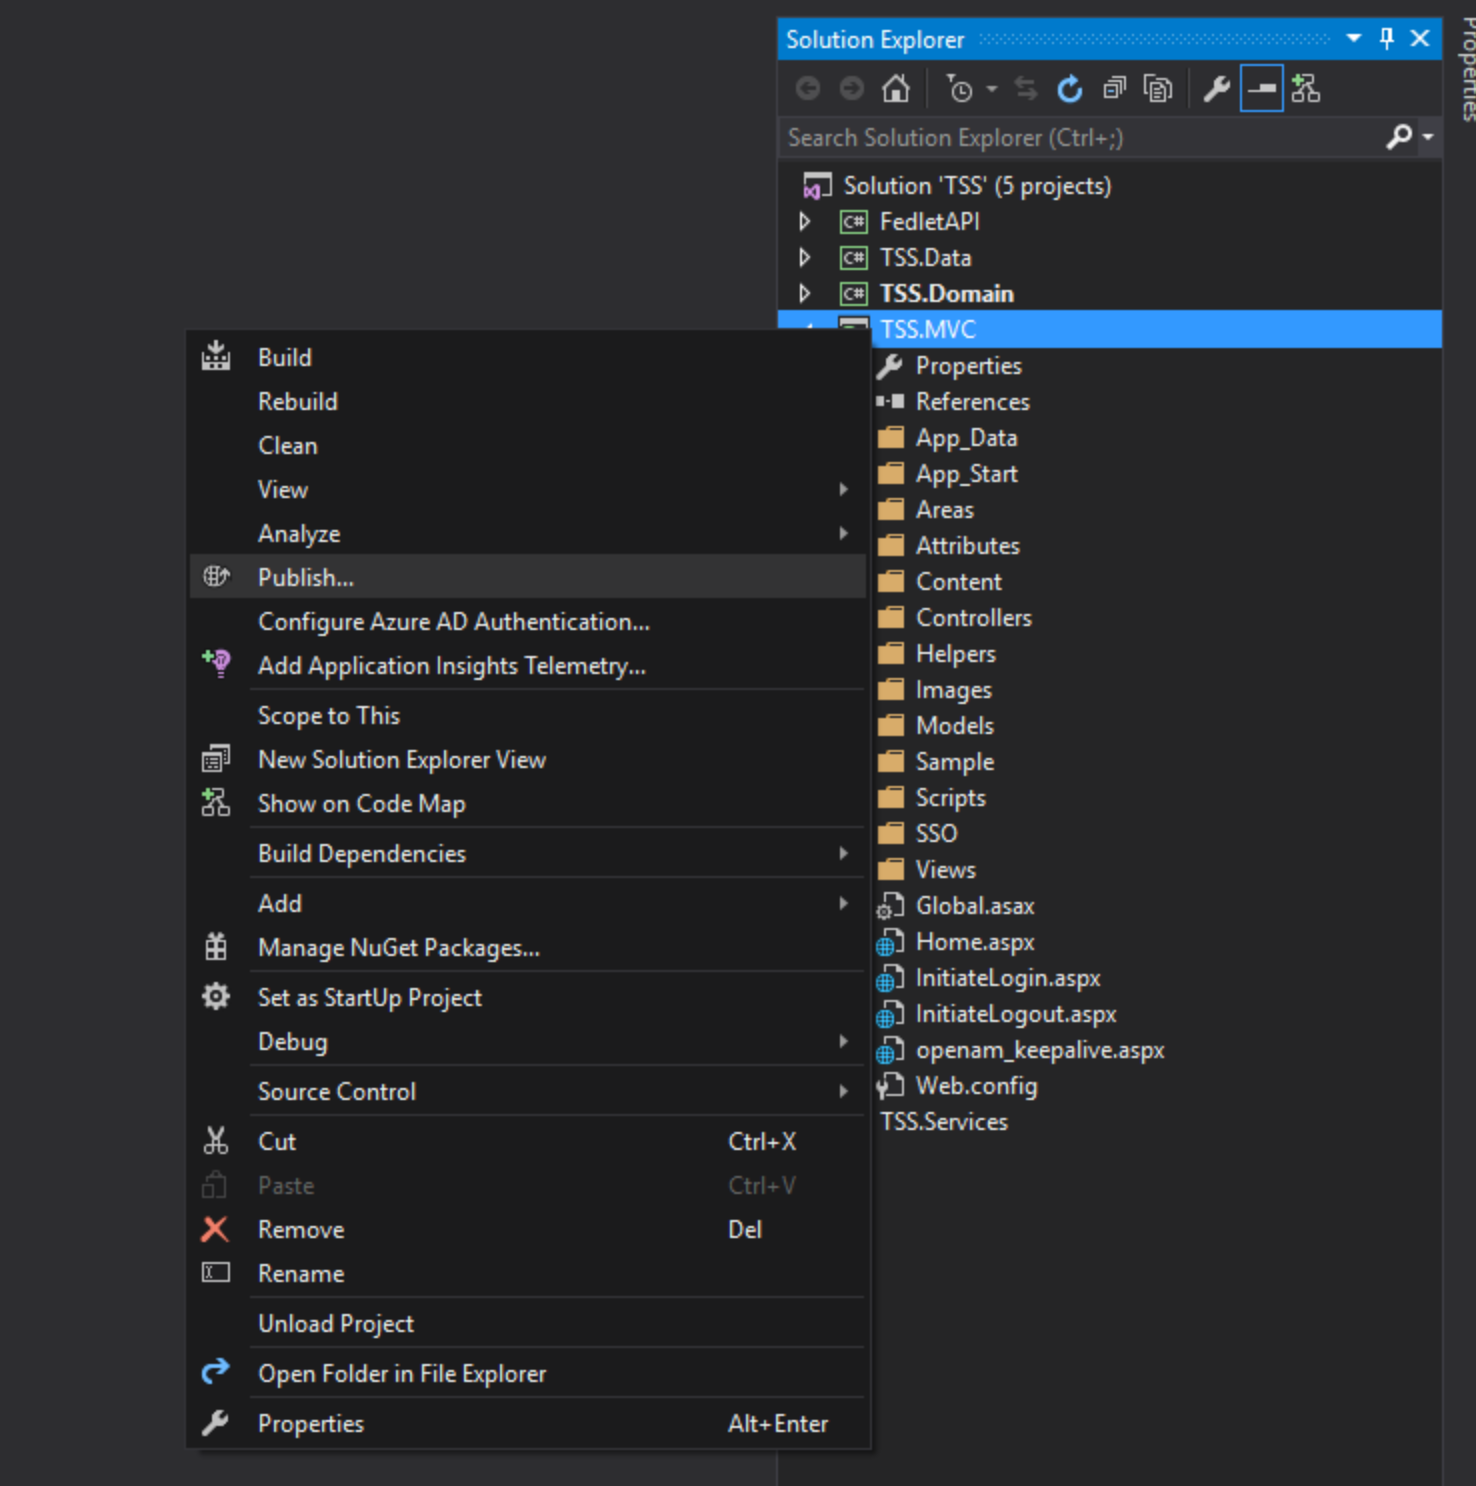
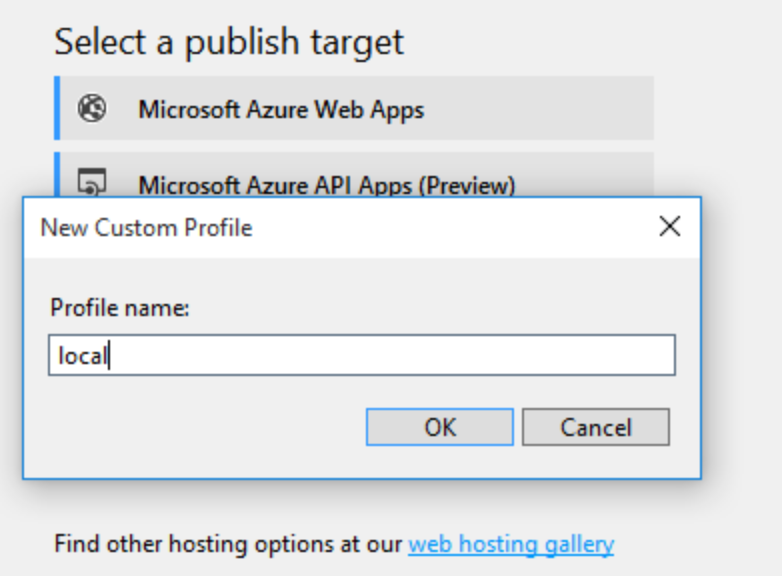
- Choose Custom profile and provide a name:

- Provide a path to where the build results should be deployed
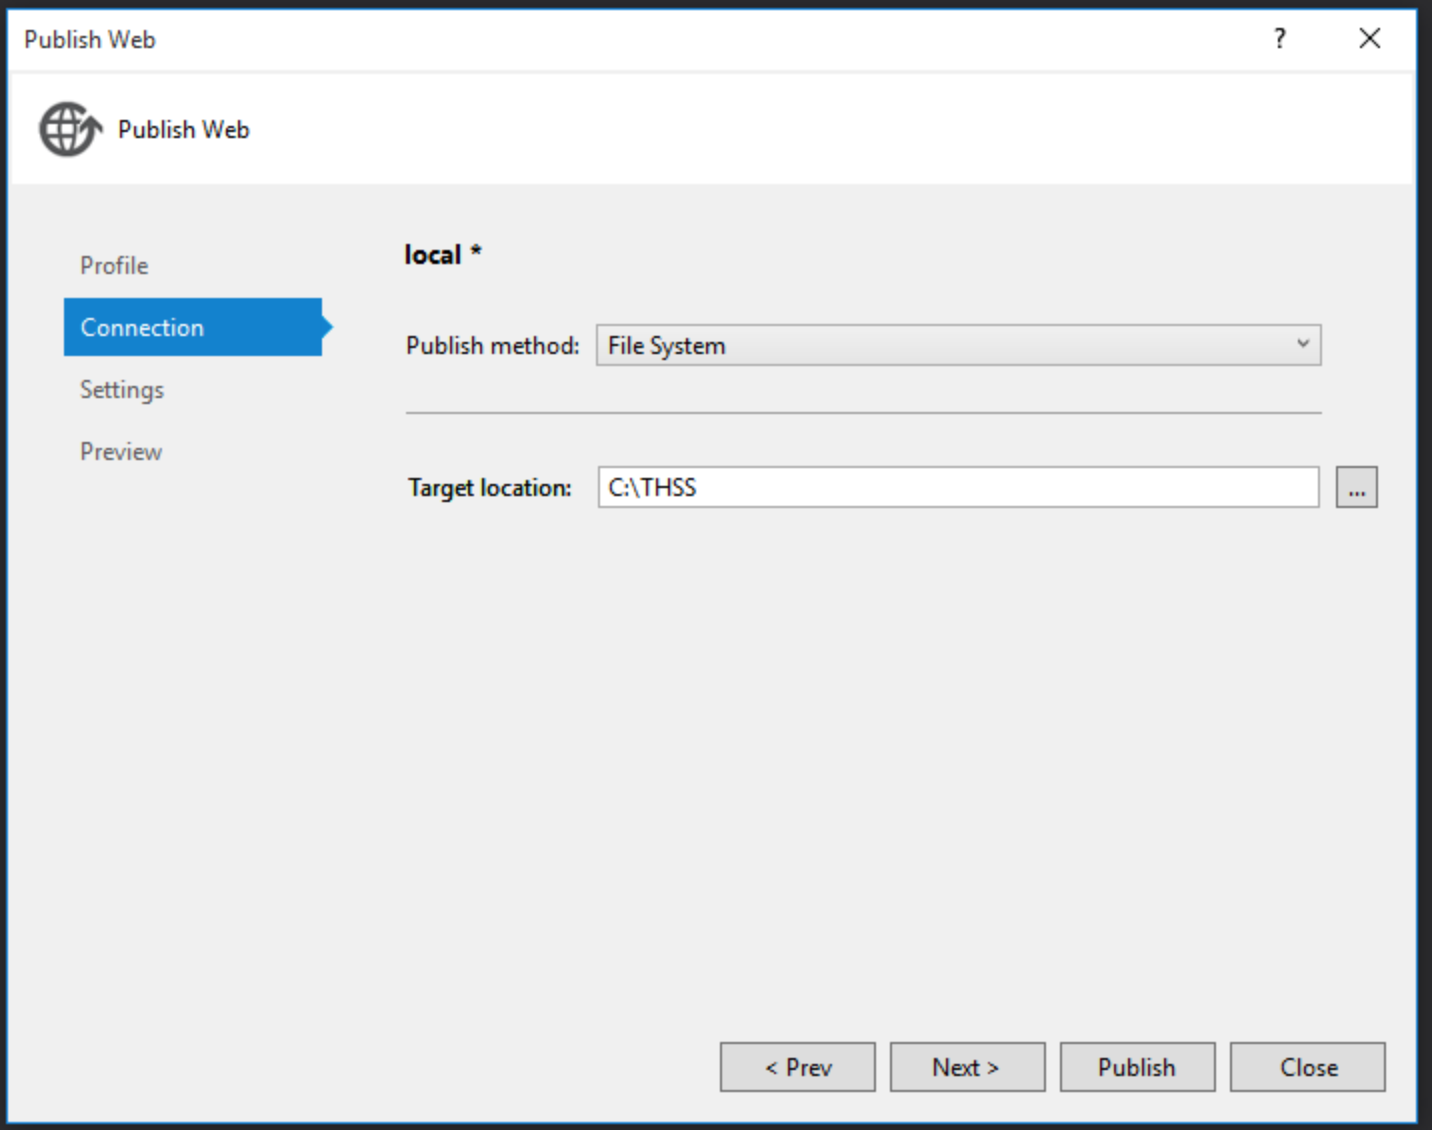
- Choose Relase - Any CPU from the Configuration
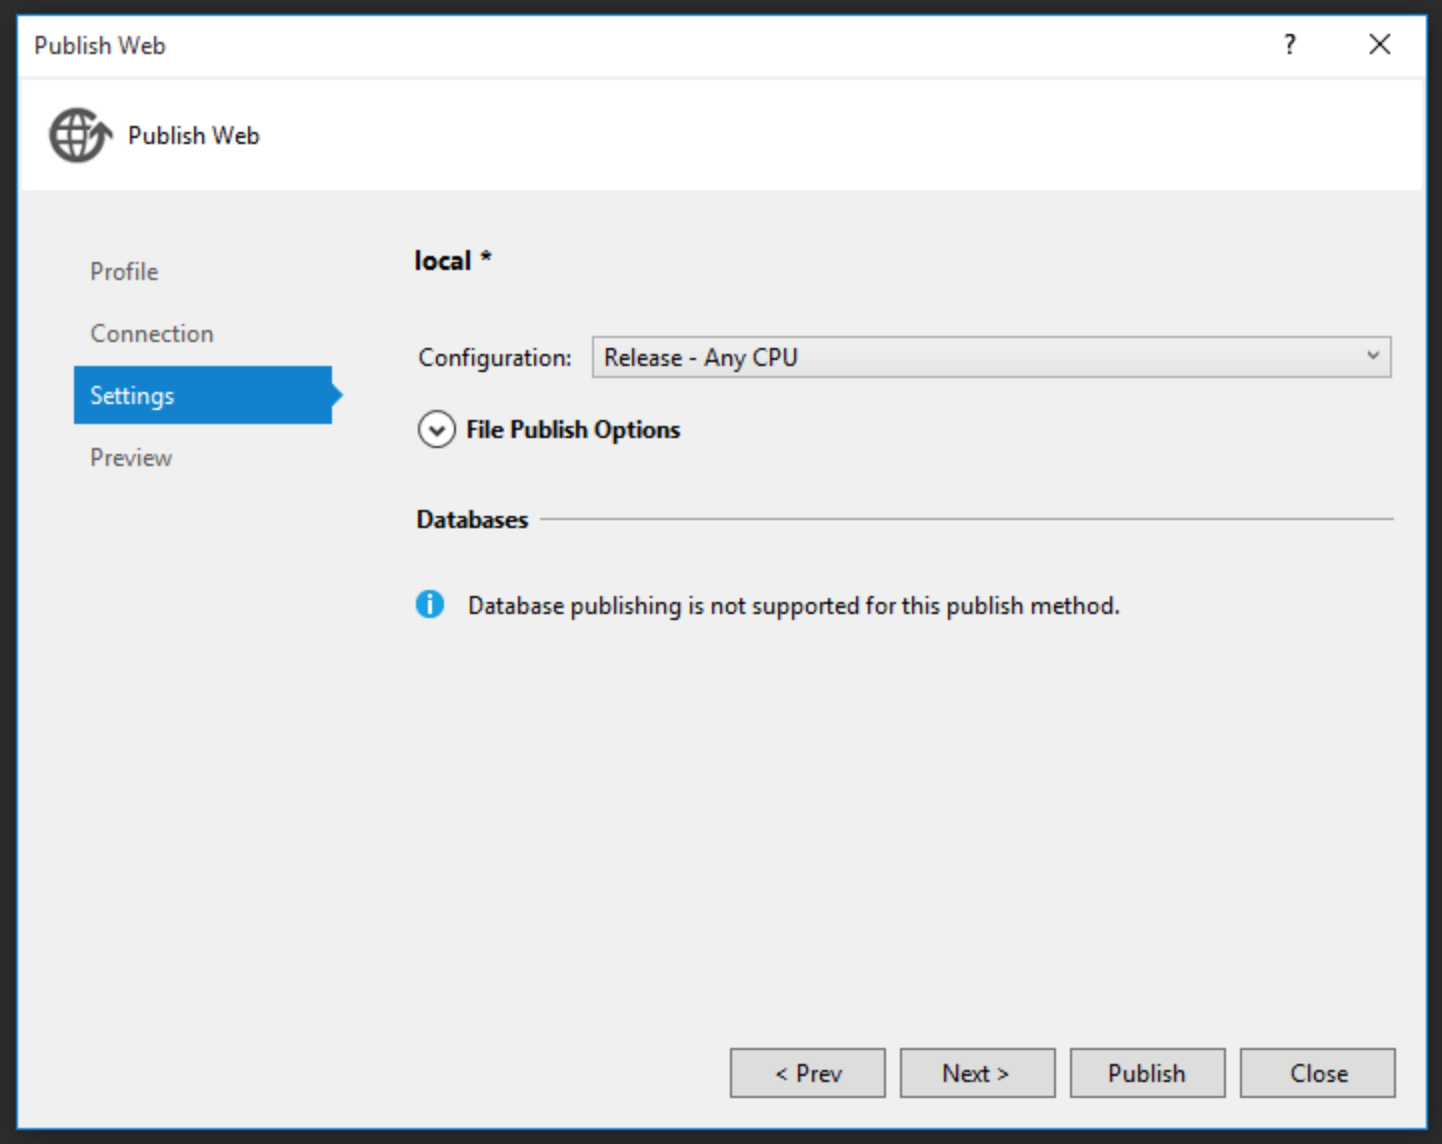
- When satisifed with all settings, click Publish

Deploy the TDS Receiver
- Connect to the AWS Windows server via RDP
- Create a directory where the TDS Receiver component will be deployed
- The TDS Receiver is a web application, thus must be accessible by IIS
- Example:
C:\inetpub\tds_receiver
- From the machine where the TDS Receiver was built, copy the entire contents of the directory where the Publish wizard deployed the component into the directory created in the previous step.
Configure a TDS Receiver Website in IIS
- Launch the Internet Information Services Manager
- Click Start button in lower-left corner (leftmost control on toolbar)
- Click the down arrow (if the Internet Information Services Manager does not appear)
- Search for and launch the Internet Information Services Manager
- Right click on the Default Web Site
- Choose Manage Website…
- Choose Stop
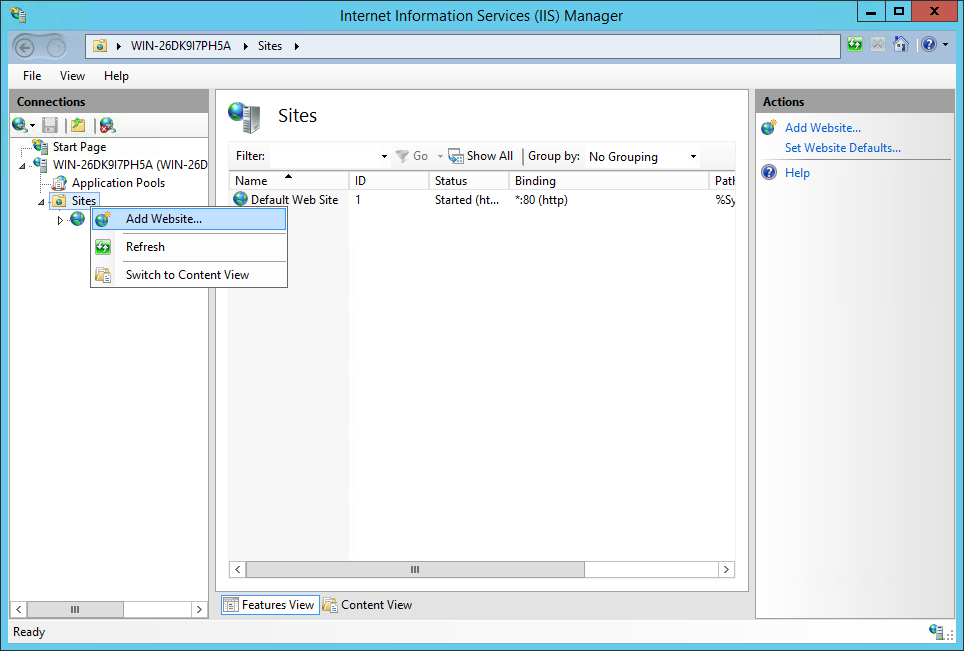
- Right click on Sites and choose Add Website…
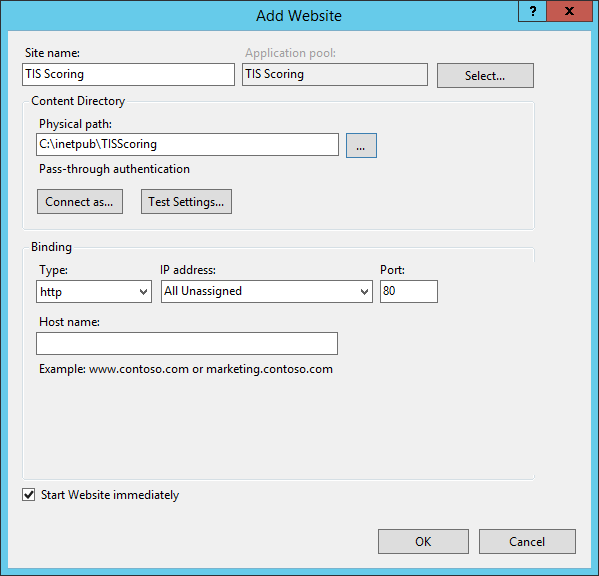
- Provide the following details in the dialog that appears:
- Site name: [Choose a meaningful name]
- Application Pool: [Choose an exisitng Application Pool, or allow IIS to create a new Application Pool for this site (recommended)]
- Physical Path: [The path to where the TDS Receiver components have been deployed]
- Binding: [Choose an available port]
- Host name: [OPTIONAL: Provide a host name]
- Screenshot showing example values for the TDS Receiver website:

Configure the TDS Receiver Application
- Edit the [Path\to\TDS Receiver]
web.configfile- Example: Edit the C:\inetpub\tdsreceiver
\web.configfile
- Example: Edit the C:\inetpub\tdsreceiver
- Update the following configuration:
WebServiceelement:OpenAM=https://[FQDN or IP address of OpenAM server]/auth/oauth2/tokeninfo
connectionStringselement:TDSQC: [Connection information to communicate with the MSSQL Server that supports the TDS Receiver]Data Source=[The FQDN or IP address of the MSSQL Server that supports the TDS Receiver]Initial Catalog=[The name of the database that supports the TDS Receiver; use OSS_TIS if following this guide]User id=[The user account that has read/write access to the database that supports the TDS Receiver]Password=[The password for the user account configured in the User id section of the connection string]
appSettingselement:LogFilePath=[The path and file name to where the TDS Receiver should write log entries]AuthTokenCache:MaxSize=[The max number of tokens to store in the cache)]AuthTokenCache:PurgeCount=[The number of entries to purge if the count is >= MaxSize]AuthTokenCache:SlidingExpirationMinutes=[If the cache is not accessed in this number of minutes, it will be dumped from memory]- NOTE: The AuthTokenCache stores authentication tokens sent with requests in order to decrease the number of calls to OpenAM in order to validate the token.
- Example of the configured
web.configsections:
  <WebServiceSettings>
    <WebService name="OpenAM" url="https://sso-dev.sbtds.org/auth/oauth2/tokeninfo" />
  </WebServiceSettings>

  <connectionStrings>
    <add name="TDSQC" connectionString="Data Source=tis-deployment.cugsexobhx8t.us-west-2.rds.amazonaws.com;Initial Catalog=OSS_TIS;User id=remoteuser;Password=[redacted]" providerName="System.Data.SqlClient" />
  </connectionStrings>

  <appSettings>
    <add key="LogFilePath" value="C:\inetpub\logs\TISServicesLog.txt"/>
    <add key="AuthTokenCache:MaxSize" value="100"/>
    <add key="AuthTokenCache:PurgeCount" value="9"/>
    <add key="AuthTokenCache:SlidingExpirationMinutes" value="240"/>
  </appSettings>
Deploy the TIS Scoring Daemon
Build the TIS Scoring Daemon
- Clone the TDS_TestIntegrationSystem repository to a machine that can build .NET applications:
git clone https://github.com[your GitHub user name]/SmarterApp/TDS_TestIntegrationSystem.git
Example:git clone https://github.com/hansolo/SmarterApp/TDS_TestIntegrationSystem.git
- Launch Visual Studio
-
Open the
TISSCoringDaemon.sln - In Visual Studio, right-click on the Solution and choose Publish…
- Choose Custom profile and provide a name:
- Provide a path to where the build results should be deployed
- Choose Relase - Any CPU from the Configuration
- When satisifed with all settings, click Publish
Deploy the TIS Scoring Daemon
- Connect to the AWS Windows server via RDP
- Create a directory where the TIS Scoring Daemon will be deployed
- The TDS Receiver is a web application, thus must be accessible by IIS
- Example:
C:\inetpub\tis_scoring
- From the machine where the TIS Scoring Daemon was built, copy the entire contents of the directory where the Publish wizard deployed the component into the directory created in the previous step.
Configure a TIS Scoring Daemon Website in IIS
- Launch the Internet Information Services Manager
- Click Start button in lower-left corner (leftmost control on toolbar)
- Click the down arrow (if the Internet Information Services Manager does not appear)
- Search for and launch the Internet Information Services Manager
- Right click on the Default Web Site
- Choose Manage Website…
- Choose Stop
- Right click on Sites and choose Add Website…
- Provide the following details in the dialog that appears:
- Site name: [Choose a meaningful name]
- Application Pool: [Choose an exisitng Application Pool, or allow IIS to create a new Application Pool for this site (recommended)]
- Physical Path: [The path to where the TIS Scoring components have been deployed]
- Binding: [Choose an available port]
- Host name: [OPTIONAL: Provide a host name]
- Screenshot showing example values for the TIS Scoring Daemon website:
Configure the TIS Scoring Daemon
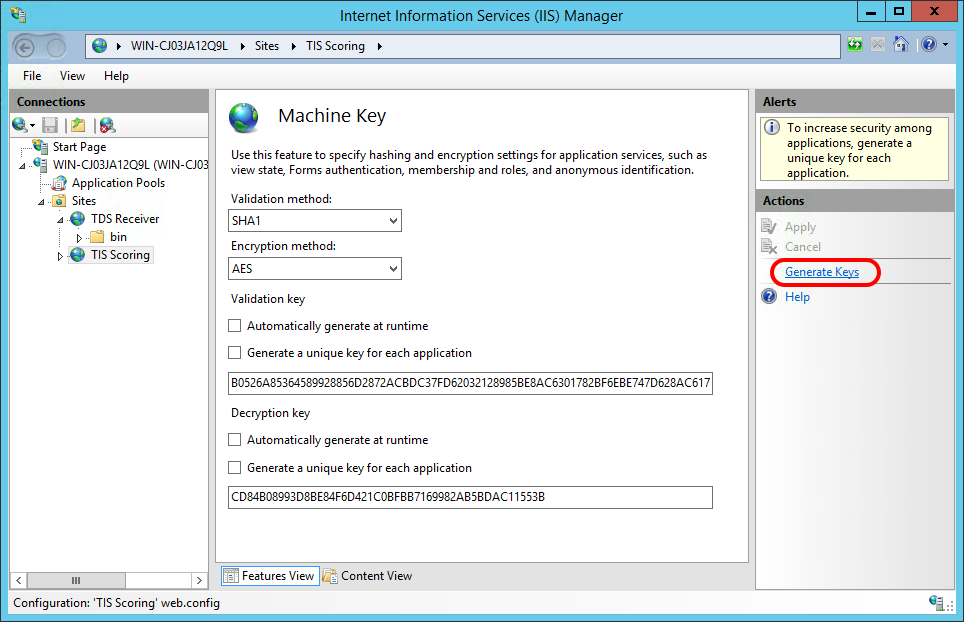
Generate a Machine Key
- In IIS Manager, choose the website for the TIS Scoring Daemon (e.g. TIS Scoring)
- Click on Machine Key:
- Click the Generate Keys link on the righthand side of the window (circled in red below):
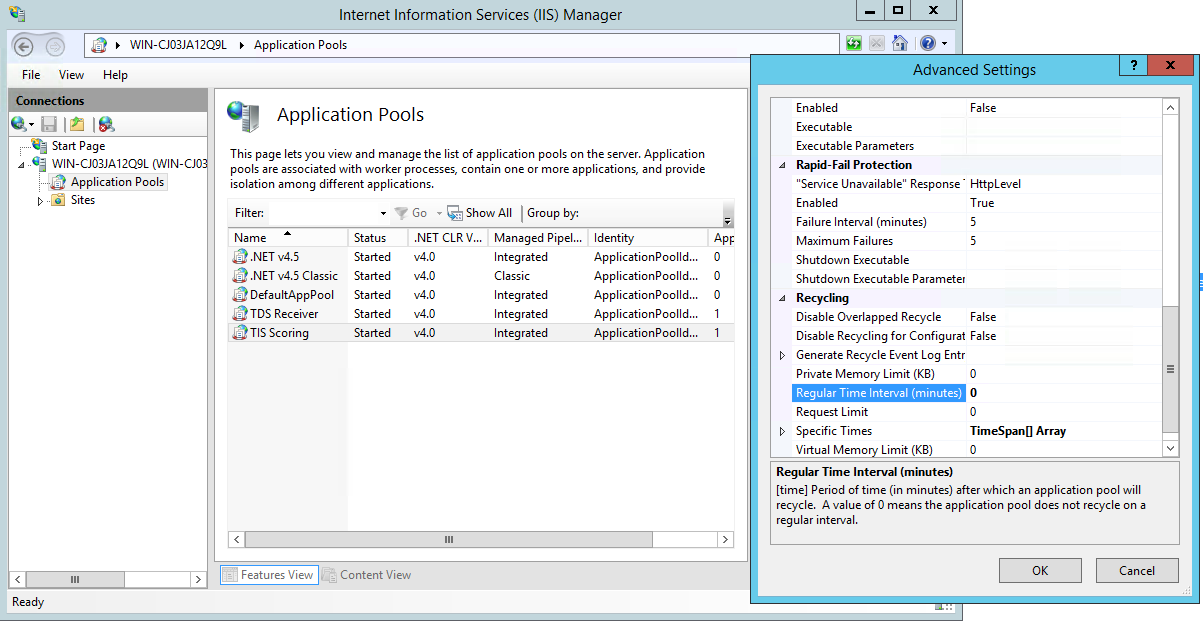
Turn Off Application Pool Recycling
- In IIS Manager, choose the TIS Scoring Application Pool.
- Right-click on the TIS Scoring Application Pool and choose Advanced Settings
- Set the Regular Time Interval (minutes) setting to 0, as shown in the screenshot below:
Configure Database Connection Information
- Use File Explorer to navigate to [Path/to/TIS Scoring Daemon/Website]
\Configuration- Example path: C:\inetpub\tis_scoring\Configuration
- Edit the [Path\to\TDS Receiver]
\database.configfile - Update the following configuration:
connectionStringselement:GEO:Cloud=[Connection information to communicate with the MSSQL Server that supports the OSS_TIS database]Data Source=[The FQDN or IP address of the MSSQL Server that supports the OSS_TIS database]Initial Catalog=[The name of the database that supports the TIS Scoring Daemon; use OSS_TIS if following this guide]User id=[The user account that has read/write access to the OSS_TIS database]Password=[The password for the user account configured in the User id section of the connection string]
- Example of the configured
database.configsections:
<?xml version="1.0"?>

<connectionStrings>
    <clear />
    <add name="GEO:Cloud" connectionString="Data Source=tis-deployment.cugsexobhx8t.us-west-2.rds.amazonaws.com;Initial Catalog=OSS_TIS;User id=remoteuser;Password=[redacted]" providerName="System.Data.SqlClient" />
</connectionStrings>
Configure Logging
- Use File Explorer to navigate to [Path/to/TIS Scoring Daemon/Website]
\Configuration- Example path: C:\inetpub\tis_scoring\Configuration
- Edit the [Path\to\TIS Scoring Daemon Website]
\logging.configfile - Update the following configuration:
sharedListenerselement:fileTrace=[Path to log file directory created earlier. NOTE: Do not supply a file name; just a path to where the log file will be written.]
- Example of the configured
logging.configsections:
<?xml version="1.0"?>

<!--
NOTE: For local debugging in DebugView turn on "Capture Global Win32"
-->

<system.diagnostics>

  <trace autoflush="true" indentsize="0" />

  <sharedListeners>
    <add name="sqlTrace" type="TDS.Shared.Logging.TDSTraceListener, TDS.Shared" ><filter type="" /></add>
    <add name="consoleTrace" type="AIR.Common.Diagnostics.OutputDebugStringTraceListener, AIR.Common" ><filter type="" /></add>
    <add name="fileTrace" type="AIR.Common.Diagnostics.FileTraceListener, AIR.Common" filePrefix="TISScoringDaemon" filePath="C:\intepub\logs\" enableUserLogging="false" enableMachineLogging="false" enableDateLogging="false"><filter type="" /></add>
  </sharedListeners>

  <sources>
    <source name="TDSConfig"><listeners><add name="fileTrace" /></listeners></source>
    <source name="TDSSql"><listeners><add name="fileTrace" /></listeners></source>
    <source name="TDSApplication"><listeners><add name="fileTrace" /></listeners></source>
    <source name="TDSRenderer"><listeners><add name="fileTrace" /></listeners></source>
    <source name="TDSAdaptive"><listeners><add name="fileTrace" /></listeners></source>
  </sources>

  <switches>
    <add name="TDSConfig" value="Information, ActivityTracing" />
    <add name="TDSApplication" value="Information, ActivityTracing" />
    <add name="TDSSql" value="Information" /> <!-- , Verbose -->
    <add name="TDSRenderer" value="Information" />
    <add name="TDSAdaptive" value="Information" />
  </switches>

  <!--
  The possible <switches> values are the following:
    * All- Allows all events through.
    * ActivityTracing- Allows the Stop, Start, Suspend, Transfer, and Resume events through.
    * Verbose- Allows Critical, Error, Warning, Information, and Verbose events through.
    * Information- Allows Critical, Error, Warning, and Information events through.
    * Warning- Allows Critical, Error, and Warning events through.
    * Error- Allows Critical and Error events through.
    * Critical- Allows only Critical events through.
    * Off- Does not allow any events through.
  -->

</system.diagnostics>
Configure Settings
- Use File Explorer to navigate to [Path/to/TIS Scoring Daemon/Website]
\Configuration- Example path: C:\inetpub\tis_scoring\Configuration
- Edit the [Path\to\TIS Scoring Daemon Website]
\settings.configfile - Update the following configuration:
appSettingselement:ScoringDaemon.HubTimerIntervalSeconds=[Time in seconds that the daemon waits before checking for data to process]ScoringDaemon.MachineName=[The machine name. If this is not set, the machine name will be retrieved and used (using C#Environment.MachineName)]ScoringDaemon.PendingMins=[Determines the number of minutes since the last attempt at scoring when finding new items to rescore. Defaults to 15 minutes if no value is provided. Used for machine scoring, and not relevant for hand scored items.]ScoringDaemon.MinAttempts=[The minimum number of attempts at rescoring machine scored items. Defaults to 0 if no value is provided]ScoringDaemon.MaxAttempts=[The maximum number of attempts at rescoring machine scored items. If scoring attempts is above this value, the item is marked with a status of ScoringError. Defaults to 10 if no value is provided.]ScoringDaemon.SessionType=[Defaults to 0 if not provided. 0 means online.]ScoringDaemon.MaxItemsReturned=[The maximum number of tests to retrieve at a time when looking for pending items that need to be scored.]ScoringDaemon.ItemScoringConfigCacheSeconds=[Seconds to cache the item scoring configuration. Defaults to 14400 (4 hours)]ScoringDaemon.ItemScoringCallBackHostUrl=[The URL of this TIS server. IMPORTANT: The URL must end with a /]ScoringDaemon.ItemFormatsRequiringItemKeysForRubric=[Defines the item types that need to have their rubrics retrieved from the student application. Defaults to “ER” if not provided.]ScoringDaemon.StudentAppUrlOverride=[Allows the student application to be overriden instead of using the value sent in the TRT.]ScoringDaemon.ItemScoringServerUrlOverride=[Allows the item scoring server URL to be overriden]ScoringDaemon.EnableLocalHostUsageForColocatedApps=[Allows the use of localhost instead of a specific URL when the student application and the item scoring are colocated on the same server. Defaults to False]
- Example of the configured
settings.configsections:
<?xml version="1.0"?>

<appSettings>
  <!-- NOTE: if the scoring daemon will be polling for responses to send off for scoring, be sure to
    set the app domain to not recycle....

    Recycling -> Regular Time Interval: 0

    If it's just being used to receive scores back via the HTTP handler (i.e., from THSS), there's no need for this.
    Also, in that case you can bump up the HubTimerIntervalSeconds too.
    -->
  <add key="ScoringDaemon.HubTimerIntervalSeconds" value="90"/>
  <add key="ScoringDaemon.MachineName" value="MyTISScoringDaemonName"/>
  <add key="ScoringDaemon.PendingMins" value="15"/>
  <add key="ScoringDaemon.MaxAttempts" value="5"/>
  <add key="ScoringDaemon.ItemScoringCallBackHostUrl" value="https://myitemscoring.myserver.org/"/>
  <!-- TISScoringDaemon doesn't have access to the item files/rubrics, so all supported item types should be configured here if the Scoring Deamon will be sending requests.  -->
  <add key="ScoringDaemon.ItemFormatsRequiringItemKeysForRubric" value="EQ,GI"/>
  <add key="secureConnectionStrings" value="false"/>
</appSettings>
Deploy the TIS Service
Build the TIS Servcie
- Clone the TDS_TestIntegrationSystem repository to a machine that can build .NET applications:
git clone https://github.com/SmarterApp/TDS_TestIntegrationSystem.git
- Launch Visual Studio
- Open the
TDSQAService\OSSTIS.sln - Build the
OSSTIS.slnusing the Release configuration
Deploy the TIS Service
- Connect to the AWS Windows server via RDP
- Create a directory where the TDS Receiver component will be deployed
- Example: C:\sbtds\Services\OSS_TISService
- Copy the content of built TIS Service ([\Path\to\TIS Service\directory]
\bin\release) into the directory (e.g. C:\sbtds\Services\OSS_TISService) created during the previous step - Launch a command prompt
- Run the following command to install and register the Windows service:
cd[\Path\to\where\TIS Service\is\deployed]C:\Windows\Microsoft.NET\Framework64\v4.0.30319\InstallUtil.exe TISService.exe- Example:
C:\> cdC:\sbtds\Services\OSS_TISServiceC:\sbtds\Services\OSS_TISService> C:\Windows\Microsoft.NET\Framework64\v4.0.30319\InstallUtil.exe TISService.exe
Configure the TIS Service
- Open [*\Path\to\TIS Service*{: style=”color: #f00;”}]
\TISService.exe.configin an editor - Update the following configuration:
connectionStringselement:ITEMBANK=[Connection information to communicate with the MSSQL Server that supports the OSS_ItemBank database]Data Source=[The FQDN or IP address of the MSSQL Server that supports the OSS_ItemBank database]Initial Catalog=[The name of the database that supports the TIS Service; use OSS_ItemBank if following this guide]User id=[The user account that has read/write access to the OSS_ItemBank database]Password=[The password for the user account configured in the User id section of the connection string]
TDSQC=[Connection information to communicate with the MSSQL Server that supports the OSS_TIS database]Data Source=[The FQDN or IP address of the MSSQL Server that supports the OSS_TIS database]Initial Catalog=[The name of the database that supports the TIS Service; use OSS_TIS if following this guide]User id=[The user account that has read/write access to the OSS_TIS database]Password=[The password for the user account configured in the User id section of the connection string]
AuthorizationSettingselement:name=[Name to use as a reference. Matches the WebServiceSettings\WebService authSettingName attribute]url=[OpenAM base url. IMPORTANT: This is only the base url and does not include the /auth/oauth2 path as that is added within the code itself.]realm=[The realm used by OpenAM; use /sbac if following this guide]grantType=[The type of OAuth grant to conduct;use password]username=[Name of user with elevated privileges that exists in OpenDJ]password=[Password for account cited in username attribute]clientId=[The OpenAM OAuth configured client id. The installation process configures a pm client which can be used out of the box. You can view the clients in the OpenAM console by going to the Access Control tab -> click sbac link -> Agents -> OAuth2.0/OpenID Connect tab.]clientSecret=[This is the default password for the “pm” client and should have been changed during installation. Starting value is sback12345]passwordEncrypted=[A boolean value that defines whether the passwords provided in this file are encrypted.]
ItemScoringSettingselement:target=[WebService target that should be used. Matches the WebServiceSettings\WebService name attribute]callbackUrl=[The callback URL that the scoring server will use to notify TIS of the results. ItemScoringCallbackRcv.axd should be used for the Teacher Handscoring target and ItemScoringCallback.axd should be used for the Math Equation Scorer.]itemTypes=[Defines the items that should be included in this group and therefore sent to the defined target. See the ItemTypes Format section below for more detail on the format itself]scoreStatuses=[A comma-separated list of score statuses that should be included. Defaults to NotScored if no value is provided.]scoreInvalidations=[Defines if invalidations be scored. Defaults to True if no value is provided.]updateSameReportingVersion=[Defaults to True if no value is provided.]isHandscoringTarget=[Set to True for the HandscoringTSS target and to False for the HandscoringTDSUnscored (e.g. equation scorer). Defaults to False if value is not provided.]batchRequest=[Defines if results should be sent as batches or individually. The Teacher Handscoring System can handle batch requests and therefore can be set to True. The Equation Scoring target can not and therefore must be set to False or left blank. Defaults to False if not provided.]
appSettingselement:ServiceName=[IMPORTANT: This should only be changd in rare circumstances where there are multiple Services accessing the same TIS database. This value is used in the OSS_TIS.dbo.TestNameLookUp InstanceName column to determine which tests this service processes.]MaxErrorEMails=[The max number of error emails to send.]FatalErrorsTo=[Email address where fatal errors are sent.]FatalErrorsCc=[Email address where fatal errors are sent via CC.]EmailAlertForWarnings=[Boolean value defining whether warning notifications should be sent via email.]WarningsTo=[Email address where warnings are sent if EmailAlertForWarnings is set to True.]WarningsCc=[Email address where warnings are sent via CC if EmailAlertForWarnings is set to True.]ScoringEnvironment=[Must match the value in OSS_TestScoringConfigs.dbo.ComputationLocations table which is TIS by default.]ClientName=[The client name of the tests TIS is processing. For IRP packages this would be “SPAC_PT.” When tests are loaded, the client name from the test is used to populate the OSS_COnfigs.dbo.Client_TestMode. If you are not sure what to set this value to check this table after loading up your tests.]EventLogName=[The name of the Windows Event Log that will be created and used for warnings and errors. NOTE: The user that this service is running as will need to have access to create and write to the Event Log. By default the Local System should have access.]EventLogSource=[The source name used in the Event Log.]ErrorLog=[Path to a log file used by the service. Make sure the user running the service has write access to this path.]SendToHandscoring=[Boolean value that controls whether items are sent to the Teacher Handscoring System or not.]IgnoreHandscoringDuplicates=[Should duplicates be ignored when processing handscoring results.]Environment=[Set to Production when deployed live. If set to “Local” or “Dev” then it allows for the TDS server to not be validated. See TDSSessionDatabases below.]IdleSleepTime=[The amount of time (in milliseconds) to sleep when there is no work to be done.]LoopSleepTime=[The amount of time the thread sleeps (in milliseconds) at each iteration of the loop]NumberOfGeneralThreads=[The total number of threads used for all subjects, except writing.]WaitForWorkerThreadsOnStopSeconds=[When the service is stopped, the system will wait this long for all worker threads to complete. Defaults to 120 seconds.]LongDbCommandTimeout=[Database command timeout in seconds]TDSSessionDatabases=[List of one or more TDS applications that are allowed to send test results to this TIS intance. The format is {server},{database};{server},{database}; The database should almost always be set to “session” and the {server} should be set to the machine name of the TDS server. TIS validates that the data coming in is from one of those servers by looking at the TRT file <Opportunity> server and database values. IMPORTANT: If Environment is starts with “Dev” or “Local” then this validation is skipped.]
ItemTypes Format
The item types string follows a specific format that can be summarized like so: {itemType}:{itemKey},{itemKey}:{isExcludedItems};{itemType}… where only the {itemType} is required.
In it’s simplest form, the string will contain a semicolon separated list of item types that should be sent to this particular target. This would look like: SA;WER;TI.
Including one or more {itemKey}’s limits the items that will be included for this {itemType} to only those listed. So SA;WER;TI:200-25662,200-19678 means that all SA and WER items are included and only item 200-25662 and 200-19678 are included for the TI type.
The last option {isExcludedItems} is a boolean value that defines if the list of {itemKey}’s provided should be included or exceluded. If it isn’t provided it defaults to true, meaning the items are included. Therefore SA;WER;TI:200-25662,200-19678:true means that all SA and WER items are included and all TI items except 200-25662 and 200-19678 will be included.
- Example of the C:\sbtds\Services\OSS_TISService
\TISService.exe.config:
<?xml version="1.0" encoding="utf-8" ?>
<configuration>
  <configSections>
    <section name="WebServiceSettings" type="AIR.Configuration.WebServiceConfig, AIR.Configuration, Version=1.0.0.0, Culture=neutral, PublicKeyToken=null" allowDefinition="Everywhere" allowExeDefinition="MachineToApplication" restartOnExternalChanges="true" />
    <section name="AuthorizationSettings" type="AIR.Configuration.AuthorizationConfig, AIR.Configuration, Version=1.0.0.0, Culture=neutral, PublicKeyToken=null" allowDefinition="Everywhere" allowExeDefinition="MachineToApplication" restartOnExternalChanges="true" />
    <section name="ItemScoringSettings" type="AIR.Configuration.ItemScoringConfig, AIR.Configuration, Version=1.0.0.0, Culture=neutral, PublicKeyToken=null" allowDefinition="Everywhere" allowExeDefinition="MachineToApplication" restartOnExternalChanges="true" />
  </configSections>

  <connectionStrings>
    <add name="ITEMBANK" connectionString="Data Source=tis-deployment2.cugsexobhx8t.us-west-2.rds.amazonaws.com;Initial Catalog=OSS_ItemBank;User id=remoteuser;Password=[redacted]" providerName="System.Data.SqlClient" />
    <add name="TDSQC" connectionString="Data Source=tis-deployment2.cugsexobhx8t.us-west-2.rds.amazonaws.com;Initial Catalog=OSS_TIS;User id=remoteuser;Password=[redacted]" providerName="System.Data.SqlClient" />
  </connectionStrings>

  <WebServiceSettings>
    <!-- configure rest targets; handscoring targets must start with or equal "Handscoring" -->
    <WebService name="HandscoringTSS" url="http://54.200.42.254/api/test/submit" />
    <WebService name="HandscoringTDSUnscored" url="http://54.186.182.136:8084" />
    <WebService name="ART" url="http://54.186.87.166:8080/rest" authSettingName="OAuth" />
    <WebService name="DW1" url="https://myDataWarehouseServer/endpoint" authSettingName="OAuthDW1" />
    <WebService name="DW2" url="https://myOtherDataWarehouseServer/endpoint" authSettingName="OAuthDW2" />
  </WebServiceSettings>

  <AuthorizationSettings>
    <!-- Can configure 1 or more oauth servers/accounts that can be used by WebService settings above -->
    <Authorization name="OAuth" url="https://sso-deployment.sbtds.org/" realm="/sbac" grantType="password" username="prime.user@example.com" password="[redacted]" clientId="pm" clientSecret="[redacted]" passwordEncrypted="false" />
    <Authorization name="OAuthDW1" url="https://myOpenAMserver2/endpoint/" realm="/sbac" grantType="password" username="name@example.com" password="[redacted]" clientId="tis" clientSecret="[redacted]" />
    <Authorization name="OAuthDW2" url="https://myOpenAMserver3/endpoint/" realm="/sbac" grantType="password" username="name@example.com" password="[redacted]" clientId="tis" clientSecret="[redacted]" />
  </AuthorizationSettings>

  <ItemScoringSettings>
    <ItemScoring target="HandscoringTSS"
        callbackUrl="http://54.187.75.133/ItemScoringCallbackRcv.axd"
        itemTypes="SA;WER;TI:200-25662,200-19678,200-6117;EQ:200-19679,200-13312"
        isHandscoringTarget="true"
        batchRequest="true" />
    <ItemScoring target="HandscoringTDSUnscored"
        callbackUrl="http://54.187.75.133/ItemScoringCallback.axd"
        itemTypes="EBSR;EQ:200-19679,200-13312:true;ER;ETC;GI;HT;HTQ;MC;MI;MS;NL;SA;TI:200-25662,200-19678,200-6117:true;TUT;WER;WIT"
        scoreStatuses="WaitingForMachineScore" />
  </ItemScoringSettings>

  <appSettings>
    <add key="ServiceName" value="OSS_TISService"/>
    <add key="MaxErrorEMails" value="25"/>

    <add key="FatalErrorsTo" value="tis.admin@example.com"/>
    <add key="FatalErrorsCc" value="tis.admin@example.com"/>
    <add key="EmailAlertForWarnings" value="true"/>
    <add key="WarningsTo" value="tis.admin@example.com"/>
    <add key="WarningsCc" value="tis.admin@example.com"/>

    <add key="ScoringEnvironment" value="TIS" />
    <add key="ClientName" value="SBAC_PT"/>
    <add key="EventLogName" value="OSS_TISEventLog" />
    <add key="EventLogSource" value="OSS_TIS" />
    <add key="ErrorLog" value="C:\inetpub\logs\OSS_TIS_ResultLog.txt"/>

    <add key="SendToHandscoring" value="true"/>
    <add key="IgnoreHandscoringDuplicates" value="true"/>
    <add key="Environment" value="Dev" />

    <add key="IdleSleepTime" value="1000" />
    <add key="LoopSleepTime" value="1" />
    <add key="NumberOfGeneralThreads" value="20"/>
    <add key="WaitForWorkerThreadsOnStopSeconds" value="120"/>
    <add key="LongDbCommandTimeout" value="90" />

    <add key="TDSSessionDatabases" value="server,database;otherserver,otherdatabase"/>
  </appSettings>

  <system.net>
    <defaultProxy>
      <proxy usesystemdefault="False"/>
    </defaultProxy>
    <mailSettings>
      <smtp deliveryMethod="SpecifiedPickupDirectory" from="tis.admin@example.com">
        <specifiedPickupDirectory pickupDirectoryLocation="C:\EmailPickup"/>
      </smtp>
    </mailSettings>
  </system.net>
</configuration>
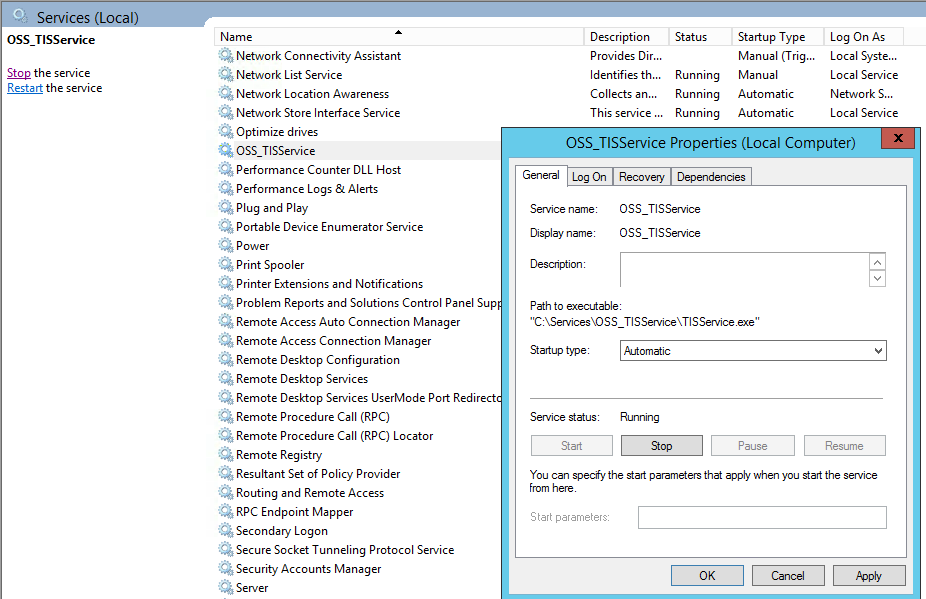
- Launch the Services pane
- Select the OSS_TISService
- IMPORTANT: There is also a TISService listed in the Services pane; ignore this service. Only the OSS_TISService Windows Service is relevant.
- Set the OSS_TISService to start automatically by right-clicking on the OSS_TISService and choosing Properties
- Example screenshot of setting the OSS_TISService to start automatically when the server starts up:
Verification - TIS Service
- From the Services Pane, start the OSS_TISService. The service should start without error.
Permission Settings
- Log into the Permissions Application
- Create a new Role named
TIS Adminand assign it to the appropriate levels. The following is a good place to start:Client,State,District,Institution
- NOTE: It’s important that the OAuth user that is configured for the
Student Report Processorhas been given theTIS Adminrole. If they are not you will receive a403status code when theStudent Report Prcessorruns and sends data toTIS.
